It doesn’t have to be easy to use

When people are specifying software one often hears the phrase ‘It must be easy to use’.

I rather think this is jumping the gun… the first and most important requirement should be more along the lines of ‘It must make the users life easier’ or ‘It must add new value to a users world’.

And if we think hard enough about it then ‘add value’ is really just an extension of ‘makes easier’… how so?

The ‘added value’ always has a goal, whether it be peer recognition, money, or sex appeal the user is still trying to achieve something by adding value to their lives and if the software enables that then it is in fact making their lives easier.

Without that (often ignored) step the product is doomed… no matter how easy the software is to use if it doesn’t make the users life easier then why are they going to use it in the first place?

This also helps explain why some dire products are actually successes. They may be an utter pain the behind to use and they may crash 50 times a day but if I take all that into account they still make my work possible or easier then I will still use them.

‘Easy to use’ is by far the secondary consideration.

Of course… once you have a product that makes the users life easier or better then ‘easy to use’ becomes much more important… after all who would voluntarily opt for something harder to use?

Oh, right, Power Users would. These folks will trade ‘easy to use’ for ‘makes my life even easier’ in a heartbeat.

Power Users seem to prefer consistency and predictability over mere ease of use. They will gladly invest hours of learning provided a) their lives get easier to use, and b) the effort is rewarded by unlocking even more potential.

Ordinary Users however will not invest hours of learning… in fact for a large majority if it isn’t obvious in a few seconds how to achieve something it is already too complex.

I’ve watched people type in a word and then click the ‘bold’ button… when nothing happens their first thought isn’t “Oh, I forgot to select the text” it’s more like “Hmmm… the bold feature doesn’t work”.

Of course what we have is a gradient of users from the most disinterested all the way up to the ‘expert power user’.

However they all have one thing in common… they are trying to make their lives easier by getting something done.

I believe this then is the baseline from which all software development must begin…

Who are the users and how does this software make their life easier?

see also

You must be logged in to post a comment.

community content (2 approved comments so far)
Click to expand

Personal Storage is Nigh
Click to expand

This is an idea that pops up every so often but I think we are close to seeing it become reality.

Stop and think for a moment about your gadgets. Maybe you have a desktop at work, one at home, a business laptop, a netbook you take on holiday, a Kindle for reading and an iPad for the couch. Possibly you’ve got an iPhone and a fridge that plays tunes in your kitchen.

As a consumer you are constantly being told that you need bigger, faster, more, better. Faster CPU’s, better graphics, longer games, more information, more storage.

But really that’s all just marketing.

I’m willing to bet that what you really want is more gratification, to be more lazy, to get the hotter girls, to have more fun.

We see from the iPhone that the multi-gigabyte HD games we have been sold on the PC for years are often outperformed in terms of fun by games targeted at small screens, consisting of a few tens of megabytes.

We watch videos on our iPads and find it fine. We watch terrestrial TV and the most annoying thing is rarely the quality of the image but more often than not the content or the impossible to follow sound.

We surf the web everywhere and almost every device lets us store bookmarks, leaving our history fragmented and broken.

We listen to audio all over the places and painstakingly replicating our music libraries from device to device. Often a track is on one device but not another, or you get two copies of it.

Every gadget we buy pushes us to have extra hard drive for extra cost.

But wouldn’t it be better to have a single device that stores all our data and allow all our other gadgets to hook up to it and access whatever is needed?

Funny enough we already have such a device.

The SmartPhone.

We carry smart phones with us everywhere, they come equipped with wireless communications, batteries, loads of Flash storage, and we are already used to charging them every night.

Imagine if you will that your iPhone has all your data on it… why then can your iPad not stream the files it needs to and from? Why can’t your fridge or your laptop?

Imagine one set of bookmarks you share everywhere, one place to hunt for that important letter, one music library to maintain.

Wouldn’t that be easier? more sensible? better for our environment?

I think so.

Sure the technology needs some work to add a little more storage, a little more battery capacity, better wireless serving. But the basics are there and as smart phone makers search for differentiating factors I’m pretty certain this is one area that will be discovered.

Personal Storage will blow away your reliance on the ‘Cloud’. Why trust a 3rd party with your data? Why put your data in place you can’t get to if the internet goes down? Why pay for storage you already have that works slower and with less reliability?

Why install your software multiple times? Why not have it on your smart phone to be pulled off and run on your other computers as needed?

This brief dalliance with software as a service will go the way of the dodo, it’s only benefit is in charging you more and making our unreliable power and internet infrastructures even more critical.

No, the future as I see it has my smart phone acting as my personal storage module and software repository and all my other gadgets as simple (potentially amazing) clients onto it.

My world, my pocket, with me everywhere.

You must be logged in to post a comment.

community content (no approved comments so far)
Click to expand

Using Generic Types for MVVM
Click to expand

The MVVM pattern seems to have become the defacto standard for implementing cool WPF applications.

Rob Eisenberg suggested using Conventions to help enforce a separation of View and ViewModel. This to me smacks of Magic Strings which is just not nice.

Lately I’ve been playing with a different method of doing this using XAML Generics.

I’d like to share this with the community and see how you all feel about this approach.

The basic idea is that all Views should derive from a ViewBase where T specifies the type of ViewModel they should be built against.

For example:

Assume we have a ViewModel of type SomeViewModel and we want to create a view that represents it, all we have to do is create the following XAML:

<ve:ViewRoot x:Class="app.SomeView" x:TypeArguments="vm:SomeViewModel"
   xmlns="http://schemas.microsoft.com/winfx/2006/xaml/presentation"
   xmlns:x="http://schemas.microsoft.com/winfx/2006/xaml"
   xmlns:ve="clr-namespace:ViewEngine;assembly=ViewFramework"
 >
</ve:ViewRoot>

and a Code Behind file:

public partial class SomeView : ViewRoot<SomeViewModel>
{
    public SomeView()
    {
        InitializeComponent();
    }
}

And bingo… our application will use SomeView everywhere SomeViewModel occurs in the visual tree.

Because of the data binding system we can now build our view referencing the view model, so assuming there is a Title property in the view model we can write this to a label like this:

<ve:ViewRoot x:Class="app.SomeView" x:TypeArguments="vm:SomeViewModel"
    xmlns="http://schemas.microsoft.com/winfx/2006/xaml/presentation"
    xmlns:x="http://schemas.microsoft.com/winfx/2006/xaml"
    xmlns:ve="clr-namespace:ViewEngine;assembly=ViewFramework"
 >
      <Label Content="{Binding Title}"/>
</ve:ViewRoot>

No naming conventions, no DataTemplate writing, just completely transparent intent.

Framework Wire-Up

Of course this doesn’t happen out of the box and requires a framework and a little global wiring up.

Let’s start with the simple bit, wiring it up, and then get to explaining how this works behind the scenes.

To make it simple I did away with the App.xaml startup system and went back to the old static main in Program.cs approach… I have no doubt it could be integrated into the app.xaml system if needed.

[STAThread]
public static void Main()
{
    var app = new Application();
    ViewEngine.Initialise(app, Assembly.GetExecutingAssembly());
    ViewEngine.Run(new WindowViewModel());
}

Simple huh?

Framework

Of course all the magic and challenge happens in the framework itself.

The basic principle is straightforward:

  • Scan the provided assembly and find all subclasses of ViewRoot.
  • Set up mappings between the ViewClasses and their models.
  • Wrap those in DataTemplates.
  • Load the data templates into the applications root ResourceDictionary.

The rest is handled by WPF for us.

There are however a couple of challenges to using Generics in WPF that make this more complex than one might expect.

Access to Properties

Not being able to access things like ResourceDictionary properties on the children of a generic type.

Fix: Create a 2 stage derivation of ViewRoot, the first called ViewRoot and the second called ViewRoot. This allows us to use the convention in the XAML and keeps the established XAML conventions runnings.

    public class RootView<T> : RootView { }
    public class RootView : ContentControl { }

Top Level Windows

Of course top level windows cannot be derived from ContentControl and must be derived from Window so we have to introduce some special case handling.

Its own assembly

As I discovered in one of my earlier posts on XAML it is important to build the ViewEngine in a separate assembly.

View Engine

Still it’s pretty plain sailing, in fact a whole ViewEngine class can be presented here. Obviously this isn’t commercial ready but it gives you a base to play with.

public interface IView { }
internal interface IViewRoot : IView { }
public class ViewRoot<T> : ViewRoot { }
public abstract class ViewRoot : ContentControlIViewRoot { }
public class WindowRoot<T> : WindowRoot { }
public abstract class WindowRoot : WindowIView { }


public static class ViewEngine
{
    private static Application sApp;

    public static void Initialise(Application app, params Assembly[] assembliesWithViews)
    {
        sApp = app;
        CreateViewViewModelMapping(assembliesWithViews);
    }

    public static Window Run(object viewModel)
    {
        var rootWindow = CreateRootWindow(viewModel);
        sApp.Run(rootWindow);
        return rootWindow;
    }

    private static void CreateViewViewModelMapping(IEnumerable<Assembly> assembliesWithViews)
    {
        foreach (var assemblyWithViews in assembliesWithViews)
            AddViewTypesToTemplates(assemblyWithViews.GetTypes());
    }

    private static void AddViewTypesToTemplates(IEnumerable<Type> potentialViewTypes)
    {
        foreach (var potentialViewType in potentialViewTypes)
            if (TypeImplementsValidViewInterface(potentialViewType))
                AddViewTypeMapping(potentialViewType);
    }

    private static bool TypeImplementsValidViewInterface(Type potentialViewType)
    {
        if (typeof(IView).IsAssignableFrom(potentialViewType))
            return potentialViewType.BaseType.GetGenericArguments().Length > 0;

        return false;
    }

    private static void AddViewTypeMapping(Type viewType)
    {
        var modelType = viewType.BaseType.GetGenericArguments()[0];

        if (typeof(IViewRoot).IsAssignableFrom(viewType))
        {
            var template = new DataTemplate(modelType);
            var visualFactory = new FrameworkElementFactory(viewType);
            template.VisualTree = visualFactory;

            sApp.Resources.Add(template.DataTemplateKey, template);
        }
        else
            sApp.Resources.Add(modelType, viewType);
    }

    private static Type FindViewForModelType(Type modelType)
    {
        return sApp.Resources[modelType] as Type;
    }

    private static Window CreateRootWindow(object viewModel)
    {
        Type viewType = FindViewForModelType(viewModel.GetType());
        if (viewType == null)
            throw new Exception(string.Format("No View for ViewModel type: {0}",
                         viewModel.GetType().Name));

        var view = Activator.CreateInstance(viewType);
        var window = view as Window;

        if (window == null)
            throw new Exception(string.Format("Could not initialise root WindowView({0})",
             viewModel.GetType().Name));
        window.DataContext = viewModel;

        return window;
    }
}

In case you also need an example MainWindow it is straightforward:

<ve:WindowRoot x:Class="app.MainWindow" x:TypeArguments="WindowViewModel" 
    xmlns="http://schemas.microsoft.com/winfx/2006/xaml/presentation"
    xmlns:x="http://schemas.microsoft.com/winfx/2006/xaml" 
    xmlns:ve="clr-namespace:ViewEngine;assembly= ViewEngine " 
        Title="{Binding TitleProperty}" Height="300" Width="300"
        Content="{Binding ContentProperty}"
 >
    <ve:WindowRoot.Resources>
    </ve:WindowRoot.Resources>
</ve:WindowRoot>

Have fun and do let me know if you find any way to make this better…

see also

You must be logged in to post a comment.

community content (1 approved comment so far)
Click to expand

MASM Assembly in Visual Studio 2010
Click to expand

Recently I have been doing some WIn32 assembly language programming, extending a simple program with some new functionality. As the program grew in length and complexity I began to miss the syntax highlighting, project management, and debugging abilities of Visual Studio.

Googling about suggesed that it was possible to get VS2010 to do what I wanted but it really wasn’t so easy to get it all set up the first time around.

In order to save myself figuring this out again, and maybe help one of you dear readers, I’m putting a step by step guide up here.

Before you start it makes a lot of sense to install support for Assembly Language Syntax Highlighting which you can find on this CodePlex project. It’s a simple download and run installer.

Step 1 : Create a clean project

File | New | Project…

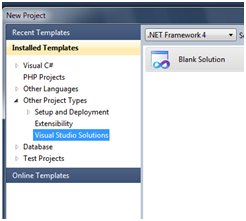
Expand the ‘Other Project Types‘ tree, Select ‘Visual Studio Solutions‘, and create a new ‘Blank Solution‘.

Create New Solution File

File | Add | New Project…

Expand the ‘Other Languages‘, ‘Visual C++‘, ‘General‘ section and create a new ‘Empty Project

Create New Project

Step 2: Acquire the MASM options.

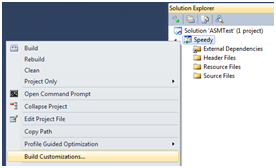
Now right click on the Project in the Solution Explorer and select ‘Build Customizations…

Menu for Build Customisations

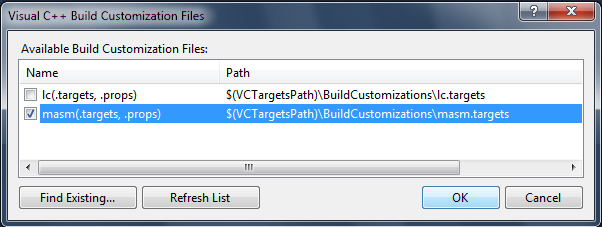
Tick the ‘masm‘ box and say OK.

Build Customisations Dialog

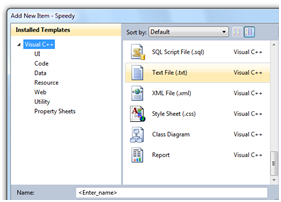
Add a new file to the project with the .asm extension by right clicking on the Project in the Solution Explorer and selecting ‘Add | New Item…‘ then ‘Text File‘. Enter a filename ending with .asm (e.g. speedy.asm). Say OK.

Create .asm File

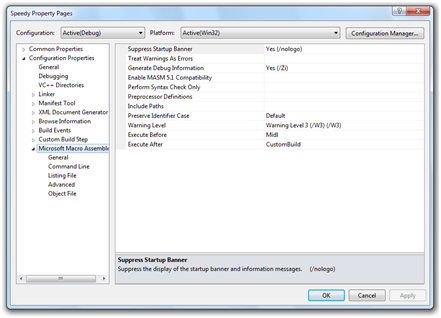
Now (and if you skipped the last steps this won’t work) right click on the Project and select ‘Properties‘. You should see a dialog like this (Note the MASM item at the bottom of the tree). If you don’t then something went wrong.

Masm Options Appear

Step 3: Configure the linker

There are a few critical things to set up in the Linker options in order to get it to work:

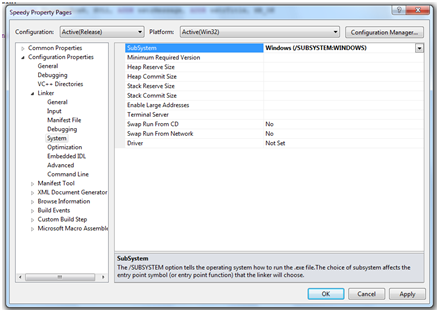
Set the following property to Windows or Console as appropriate

Configuration Properties > Linker > System> SubSystem

Select required sub system

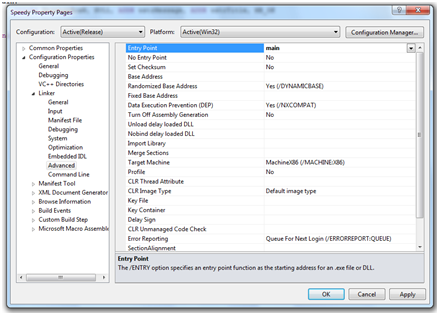
Set the entry point to the name of your main method (as per the END directive – see code)

Configuration Properties > Linker > Advanced > EntryPoint

Specify the entry point

Step 4: Write some code & Run it

Lets write a very simple assembly language program to test this out (if you want to learn about assembler you could well try Iczelions’ tutorials and the MASM Forum.

.586
.model flatstdcall    
option casemap :none   
 
; To get unicode support 
include		\masm32\macros\ucmacros.asm		
 
include		\masm32\include\windows.inc 	
include		\masm32\include\kernel32.inc 
includelib	\masm32\lib\kernel32.lib 
 
include		\masm32\include\user32.inc 
includelib	\masm32\lib\user32.lib		
 
.data
; WSTR gets you a unicode string definition
WSTR wstrTitle, "Hello"					
WSTR wstrMessage, "World"
 
.code
 
main:
	invoke MessageBoxW, NULL, ADDR wstrMessage, ADDR wstrTitle, MB_OK
 
	invoke ExitProcess, eax
end main

NOTE: Possibly the most important thing to note here is the ‘end main’ directive. This directive must be present and the name must match the label where you expect execution to kick off and the ‘EntryPoint’ we defined in step 3. Otherwise things simply won’t work.

Hit Ctrl + Shift + B to build (or use the menus etc) and it should build and run showing a simple windows message box.

Boring but proves it’s working.

Step 5: Set break points and debug it 🙂

The really cool thing is that now you can set break points and step through your code much as you are used to doing with C++ or C# 😀

Side Note: File extensions

A small problem that you might run into is that if you move any macro definitions into their own file you need to be absolutely sure NOT to call the file .asm. If you do the linker will get horribly confused and go on and on and on about not being able to find the EntryPoint. I lost hours trying to figure that one out! Call it something .inc instead and all will be good.

The other thing is that Visual Studio seems to create a larger executable (even in release mode) than using masm on the command line. It seems to be something to do with the way it interprets the WSTR macro but I’m not 100% certain. Still if it becomes a huge issue I can always compile on the command line just before release and I get to enjoy nice debugging in the meantime.

So, there you have it. VS2010 compiling Win32 Assembler by way of the included MASM compiler.

You must be logged in to post a comment.

community content (19 approved comments so far)
Click to expand
Design and Content © Copyright Duncan Kimpton 2010